Not just the gameplay, but streamers have various elements on their screen while streaming like a face-cam, live subscriber count, information of different platforms through which you can donate to them, etc. All this is not possible natively via YouTube. This is where a program like OBS or Open Broadcaster Software is immensely helpful. OBS is fairly simple to set up and use on a Windows PC but getting OBS to run without any issues or with full functionality on a Mac can be a daunting task. However, if you follow all the steps mentioned in this guide in the right order, you can have OBS working on your Mac and you’ll be ready to live stream onto your favorite platforms. Do note that the process requires a fair bit of time and patience so don’t rush into it. Also, Macs are not the best machines out there for gaming so you can also use this tutorial to use OBS for streaming a live class if you’re a teacher, or if you want to stream gameplay from your smartphone using a capture card, you can use OBS on your Mac for that too. OBS also lets you record your screen if you only want to do that. While macOS has an in-built screen recorder, OBS gives you a plethora of additional options like adding overlays and recording multiple windows together along with multiple audio sources, so it’s more powerful and versatile. You can even choose to record in your preferred resolution, frame rate and bit rate which you cannot do with the default screen recorder in macOS.
How to Live Stream From your Mac using OBS
Installing OBS
The first step would be to, of course, download OBS from the official website. Make sure you download the macOS version with .dmg extension. Once done, just double click on the downloaded file in your “Downloads” folder or wherever you chose to save it. You may need to grant a few permissions while installing so just follow all the on-screen instructions without fail. All you need to do after that is drag the OBS icon into your application folder and OBS is now successfully installed on your Mac. Do not run/open it at this stage.
Downloading Required Drivers
To be able to use OBS to its fullest potential on a Mac, you will need additional drivers to enable multiple audio streams. You can also use a third-party app for this like Soundflower which we used to enable internal audio while recording your screen on a Mac using the in-built screen recorder on macOS. However, using driver software is simpler and you don’t have to meddle with a lot of settings every time. The required driver can be downloaded from here if you’re running macOS Mojave or earlier and if you’re on Catalina, download the driver from here. Do note that on the download page for the drivers, it may tell you that this driver is old and does not have support anymore. It still works, though, so you can download it without any problems.
Setting Up Additional Sound Drivers
While OBS would still work fine at this stage, you will not be able to record or stream with multiple audio sources, i.e. you will only be able to use a microphone which will pick up your voice, but your Mac’s internal sound or the in-game sound if you’re playing a game will not work. So, let’s install the driver you downloaded in the previous step and set it up to work with OBS. Just as you would with any other .dmg file, double click on it and wait for it to open a Finder window where you need to double click on the installer package. If you are on macOS Mojave or earlier – Just follow on the on-screen instructions and grant all the required permissions. You may be prompted again that the driver is obsolete but just ignore those warnings. If it asks you to “Allow” the installation through the “Security and Preferences” menu then do so. If it throws a message along the lines of “System Extension Blocked”, just click on “OK” and head over to System Preferences manually and then to Security and Privacy and click on “Allow” in the bottom section. You’re good to go.
If you are on macOS Catalina – Once you run the installer, you will be prompted with a message that says you will have to restart your computer later so just select “Continue Installation”. As the installation proceeds, you may be asked to input your Mac’s password several times to write to your storage. Mid-way through the installation, you may be prompted with “System Extension Blocked”. To fix this, click on “Open Security Preferences” and you will see an “Allow” option as you see in the screenshot above which you need to enable by clicking on the small lock icon on the bottom left. If you do not get the “System Extension Blocked” prompt and your installation is complete, manually head over to “System Preferences” and then to Security and Privacy and check if the option to allow the install in showing. If it is not, you’re good to go. If it is, then select allow by following the same method as above. Once you’ve clicked on “Allow”, you may see another prompt telling you that you need to restart your Mac for the installation to complete. DO NOT restart just yet. Click on OK and head back to the installer window. If you see a green tick saying installation successful, you can now restart your Mac.
Enabling Installed Drivers to Work with OBS
Once you’ve restarted your Mac, open Audio MIDI Setup (you can do so through Spotlight search). On your screen, you will see a small “+” icon on the bottom left corner. Click on it and select “Create Multi-Output Device”. Rename what you just created to “OBS” and on the right pane, check both tick boxes under “Use” and “Drift Correction”. You can now close Audio MIDI Setup and open up System Preferences and head over to Sound. Under the “Output” tab, you should see a new “OBS” option you just created. Select it and close the window.
Setting up OBS
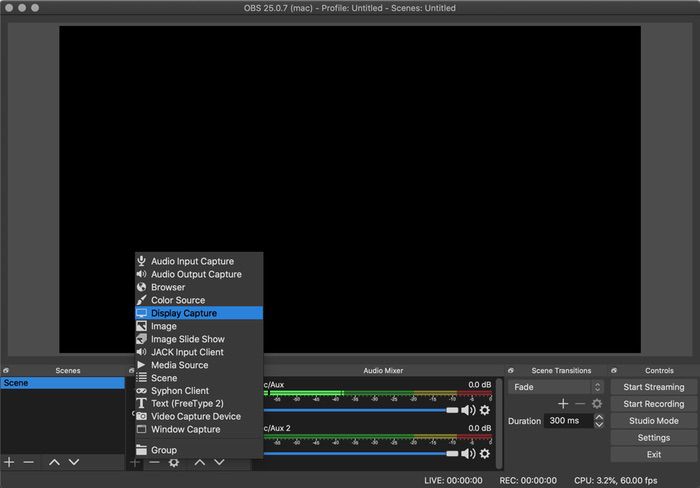
Launch OBS from your Applications folder. When asked if you want the program to auto-configure settings for your Mac, select Yes. You will then have to select if you want to Optimize OBS for recording or for streaming. Choose the one you want to use OBS primarily for. Regardless of what you choose, you will be able to record and stream, so it doesn’t really matter. On the next screen, you will be asked to set your desired screen resolution. Here, if you have a powerful Mac, let’s say a 15-inch MacBook Pro and higher, an iMac, a Mac Pro, then you can safely choose 1920×1080. If you have a MacBook Air, a 13-inch MacBook Pro, an 11/12-inch MacBook, then it’s advisable to scale down to 1280×720 or you may have performance issues and frame drops. You can stick to the default frame rate option. Next, you will have to input your YouTube credentials in order to stream directly from OBS. TO do this, you will have to input your Stream Key which you can get by clicking on the “Get Stream Key” option and logging into YouTube on your browser. Copy the key and paste it into OBS. Do note that this key is secretive and should not be shared with anyone else. Change the bitrate to 4000. Once you click on Next, OBS will configure itself with the desired settings and then click on “Apply Settings”. What you see now is the main OBS window where you can add as many elements or sources that you want to stream. Before we do that, though, let’s configure the settings. Click on the “Settings” option on the bottom right under “Controls”. Then, go to the “Output” tab and change “Output Mode” to “Advanced”. Under “Streaming”, select “Encoder” as x264 and set “Bitrate” to 4000 Kbps for a powerful Mac and if you have fast internet connection, 1500-2000 Kbps for a weaker machine and slower internet. Under “Recording”, choose the path you want to save the video in, change “Recording Format” to “mp4”, set “Encoder” to x264, “Bitrate” to 40000 Kbps for a powerful Mac and 15000-20000 Kbps for a weaker machine. The head over to the “Audio” tab and select “Mic/Auxiliary Audio” and select “Built-in Microphone” or if you’re using an external mic, you can select that. “Mic/Auxiliary Audio 2” is where we will assign Mac’s internal audio so select “iShowU Audio Capture”. Then, go to the “Video” tab and select “Output (Scaled) Resolution” to 1280×720 and “Downscale Filter” to Lanczos. Click on OK. You’re now ready to stream using OBS on your Mac! To add sources or basically whatever you want to display on your screen while streaming/recording, select the “+” button under sources and select “Display Capture” if you want to stream everything that’s on your display, or “Window Capture” if you only want to stream content from a particular window, a game for example and do not want to show what else is running on your Mac. You can add multiple images and overlays that you can download to make your stream look fancy. Once you’ve added all the elements you want to stream, all you need to do is hit the “Start Streaming” option under “Controls”. If you just want to record, select “Start Recording”.
Important Note: After you finish streaming, click on the small speaker icon on your Mac’s status bar and select the output source as “Headphones” or “Internal Speakers” or whatever you usually use to listen to audio coming from your Mac. Remember that every single time you want to use OBS, click on the same speaker icon and select “OBS” as the output source, or else your internal audio will not get captured. Phew! Quite a lengthy process, right? It’s a one-time thing, though, so next time you want to stream, just fire up OBS and all your required sources will be retained, so all you have to do is start streaming. If you get stuck anywhere during the process, just start over from the beginning or you can tweet to us @TechPP and we’ll be glad to help you out. Happy streaming!