Here we have compiled a list that will help you not only in reducing the time you take to make a presentation, but you will also find some handy tips on how to give the presentation in a more efficient way.
Edit photos
Microsoft PowerPoint provides the option to edit images from within the app itself. Though not even close to Photoshop, but if you only want to correct the color and other aspects of the image, crop some parts out of it, change its background, and put some artistic effects to it, you can do that without having to take help from any other image editing tool. For doing that, select the image; from the Picture tab of the ribbon, click on Format and that will roll down all the editing options.
Compress images
Images and relevant pictorials can make your presentation more interesting and vivid. But carpeting your demonstration with pictures will increase the file size of your presentation. Size difference might come as a hindrance while sending the file over to someone via email. Thankfully, in PowerPoint, there is an option to compress images. To do that, select the picture, you should see the Picture tab at the right most in your ribbon, click on Compress Pictures. Now from the Target output, click on Email (96ppi): minimize document size for sharing. To save the quality loss you can first try going for 220ppi and see if that file size is fine by you.
Use the wished-for fonts
One of the biggest glitches we face while giving a presentation is the conflict over fonts. You originally designed it using Helvetica and the host computer through which you are going to give the presentation doesn’t have that font. Very often in order to make our presentation look great and add crisp effects to its content we use 3rd party fonts. The problem is that when you will run this presentation file on someone else’s computer, unless they have the same fonts on their system, which is very less likely to happen, the orientation of your file content will totally get messed. This will happen because that system, due to lack of required resources will override your fonts with default fonts. To get this right, go to File -> Options, click on the Save button and make sure to tick the “Embed fonts in the file.”
Zoom in to a particular object
Suppose you are giving a presentation, and a guy from the last row complains that he can’t see right most of the graph. What would you do? You can’t zoom in and make it bigger because it will only zoom the center part. To patch this problem, we have a nifty tool called ZoomIt. Besides this, you can also set a countdown timer which will let people know how long do they have before break.
Blackout/Whiteout the presentation to center the attention back to you
As pointed out by David Pogue of NYTimes in the TED talk he gave recently, the audience could get distracted by the visuals you have used in your slides. To get their attention back to you, just press the key B and it will blackout the screen. However, if you want to whiteout it, press the key W. To get back to the slide, press any other key.
Jump to slide number n
If you feel your allocated time is about to get over, or for any other reason you want to skip a few slides and jump to a specific slide, you can simply press that slide number and it will take you there. However if the slide number you entered is higher than the number of slides in that file, it will direct you to the last slide.
Broadcast your presentation
Yet another likeable feature of Microsoft Powerpoint and Impress is broadcasting of presentation. To do this, all of you need to possess is an Outlook email ID (or Live). Sign in to your account, click File, go to Share pane, click on Present online and then it will generate a link that you can share with others.
Alternatively you can also save your presentation as a video file, by going to File -> Save as and saving it as either mp4 or wmv file. And after that you can upload that video on YouTube and send the link to your friends.
Draw on your slide; use your mouse as a pointer
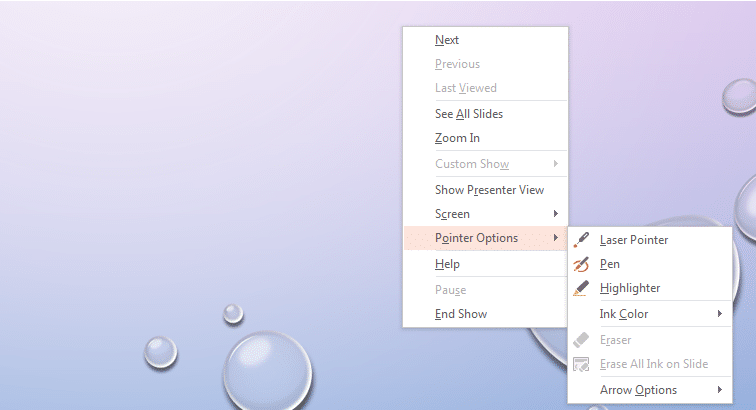
If you think sketching something on your slide will help you clarify the points, you can surely do that. Just open any slide, right click anywhere on the screen and choose a pointer. You can either choose a laser pointer or a pen. With a pen you can draw things on the slide show, and there is also a highlighter, in case you want to highpoint something.
Rehearse
Worried with the time you are spending on each slide? PowerPoint has this feature called Rehearse which runs a timer at the bottom of the slide. Practicing with the timer on can help you evaluate your speed.
Check accessibility status
One of the most essential things to take care of while making a presentation is to ensure that all the slides are reasonably perceptible to visually challenged people. How the texts are appearing to them, how the boxes might be projecting to their retinas, and other aspects should be considered while making the presentation. Microsoft PowerPoint facilitates this feature. To get you document checked – Go to File, click on the Info pane, click on Check for issues, and under that select Check Accessibility.


